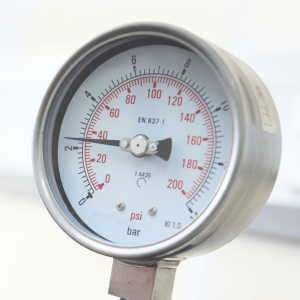
Specialising in the field of pressure calibration with many years of experience we have been accredited for UKAS pressure calibration since 2003. We carry out UKAS pressure calibration on pressure instrumentation including dead-weight testers, transducers, indicators, and vacuum gauges.
Read more on how to care for your pressure gauges.
Pressure GaugesTo Top | ||||
| Traceable Calibration for Pressure Gauges – Class 1 to 4 – 120 bar (Up to 1700 psi) | Traceable | Add to Quote | ||
| Traceable Calibration for Pressure Gauges – Class 1 to 4 – 120 – 1200 bar (1700 -16000 psi) | Traceable | Add to Quote | ||
| Traceable Calibration for Vacuum Gauges (-0.97 to 0 bar (-14 to 0 psi)) | Traceable | Add to Quote | ||
| Traceable Calibration for Tyre Pressure Gauges – Inflation & Bar Type – Up to 120 bar (Up to 1700 psi) | Traceable | Add to Quote | ||
| UKAS Calibration for Pressure/Vacuum Gauge – UKAS – -0.97 to 1200 bar (-14 to 16000 psi) | UKAS | Add to Quote | ||
| UKAS Calibration for Pressure Gauges(Standard Test) – UKAS – STD Test Gauges – Up to 1200 bar (Up to 16000 psi) | UKAS | Add to Quote | ||
Air Gauge UnitsTo Top | ||||
| Traceable Calibration for Air Gauge Unit – Federal Type | Traceable | Add to Quote | ||
| Traceable Calibration for Air Gauge Unit – Mercer Type | Traceable | Add to Quote | ||
Pressure Calibrators & IndicatorsTo Top | ||||
| UKAS Calibration for Pressure Transducers – No Display mA/ VDC output | UKAS | Add to Quote | ||
| UKAS Calibration for Pressure Indicator | UKAS | Add to Quote | ||
| UKAS Calibration for Additional Transducer for Indicator | UKAS | Add to Quote | ||
| UKAS Calibration for Pressure Controller – Single Range | UKAS | Add to Quote | ||
| UKAS Calibration for Pressure Controller – Barometric Range | UKAS | Add to Quote | ||
| UKAS Calibration for Pressure Controller – Additional Transducer | UKAS | Add to Quote | ||
| UKAS Calibration for Pressure Calibrators – Druck DPI 60X ect (Presure Only (Check UKAS Range)) | UKAS | Add to Quote | ||
| UKAS Calibration for Additional Transducer for Calibrator | UKAS | Add to Quote | ||
ManometerTo Top | ||||
| Traceable Calibration for Manometer – Digitron / Keller/Airflow Dev/Comark (Pressure calibration – Not Flow) | Traceable | Add to Quote | ||
Dead Weight TesterTo Top | ||||
| Traceable Calibration for Dead Weight Tester – Single Range (Pressure Equivalent) | Traceable | Add to Quote | ||
| UKAS Calibration for Dead Weight Tester – Single Range (Pressure Equivalent) | UKAS | Add to Quote | ||
| UKAS Calibration for Dead Weight Tester – Additional Mass Set (for Single Range DWT) | UKAS | Add to Quote | ||
| Traceable Calibration for Dead Weight Tester – Dual Range (Pressure Equivalent) | Traceable | Add to Quote | ||
| UKAS Calibration for Dead Weight Tester – Dual Range (Pressure Equivalent) | UKAS | Add to Quote | ||
| UKAS Calibration for Dead Weight Tester – Additional Mass Set (for Dual Range DWT) | UKAS | Add to Quote | ||
If you haven’t found the calibration you require or need some further assistance with your requirement, contact us using this form and we can find the solution you are looking for.
To ensure we can promptly address your calibration enquiry, please complete the form with all the necessary details. This will help us to provide you with accurate and timely assistance.
For urgent enquiries, please contact us directly via phone at:
This standard specifies the tolerances and limits for simple forms of pressure gauges such as:
It is highly recommended that an appropriate authority such as a UKAS approved laboratory carries out a full calibration on pressure gauges at least once a year. In between UKAS calibrations at a frequency based on usage, pressure gauges coulld be calibrated in-house. A typical in-house calibration would include a written procedure and an associated calibration record sheet, which would contain as a minimum, the following listed information:
(a) Serial number
(b) Location
(c) Procedure number
(d) Accuracy class
(e) Results
(g) Measurement uncertainty
(h) Sentence if appropriate
(i) Date and calibrators signature
(j) Traceability to National Standards
It is necessary that any person carrying out such calibration work should have received appropriate training and have shown the ability to be confident via a suitable training authority. Training records should be held and maintained.
Following are layouts for typical in-house calibrations for pressure gauges:
Calibration to be carried out in accordance with in-house procedure number …………………..
Serial Number:
Make:
Calibration Date:
Sizes:
FEATURE EXAMINED SPEC. MEASURED RESULTS
Applied Pressure
The pressure gauges were visually inspected for damage and the following faults were noted:
MEASUREMENT UNCERTAINTY +/- 0.017% of reading, Range 550 kPa to 110 MPa – (Applicable for UKAS calibrations only)
Source: UKAS schedule of accreditation, Calibration and measurement capability (CMC)
Calibrators Signature: ………………………………….
A traceability statement in this section would be required for all items and their relevant certification utilised for the calibration of plain limit gap gauges.
All of our Laboratories are accredited to provide UKAS & Traceable calibrations to all the relevant standards giving you peace of mind.
Make consistent, accurate and reliable measurements
Ensure longevity of the measuring instruments
Ensure safety in critical applications such as medical and aerospace
Rhopoint Metrology Ltd Eurolab House, Unit 10 Valepits Road, Garretts Green Industrial Estate, Birmingham, B33 0TD
Rhopoint Metrology Ltd Brunel House, 28 Old Mills Industrial Estate, Paulton, BS39 7SU